![]()

Cypress is a C++ Spiking Neural Network Simulation Framework. It allows to describe and execute spiking neural networks on various simulation platforms directly in C++ code. It provides a wrapper around PyNN, which allows to directly run networks on the Human Brain Project (HBP) neuromorphic hardware systems. Cypress also allows to transparently execute the networks remotely on the HBP Neuromorphic Compute Platform, significantly shortening the time required when performing experiments.
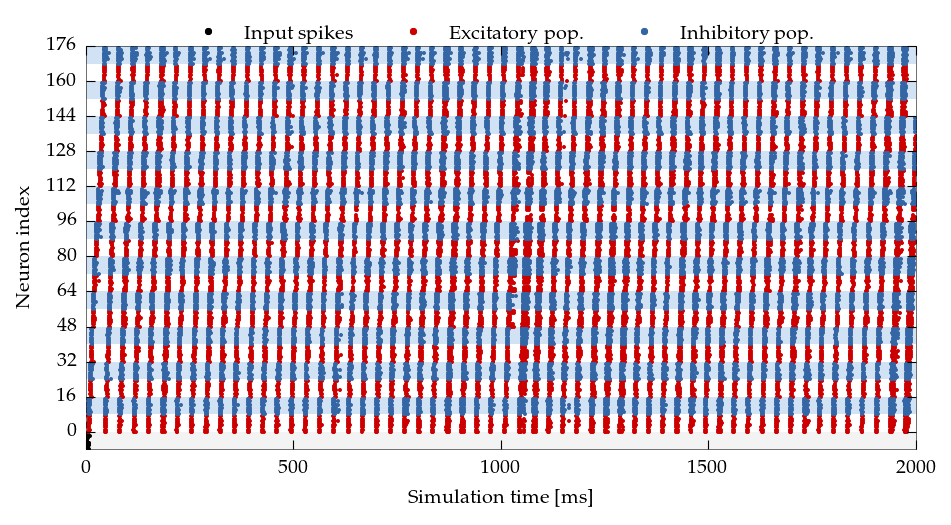 Synfire chain example running on the Spikey neuromorphic hardware system
Cypress requires a C++14 compliant compiler such as GCC 4.9 and CMake in version 3.0 (or later). In order to run Cypress applications on the Neuromorphic Compute Platform, they must be statically linked. To this end you should install the glibc-static and libstdc++-static libraries provided by your distribution. On Fedora you can install these using
sudo dnf install glibc-static libstdc++-staticThe library ships with a simulator that supports all basic requirements (GeNN, see github.io ). If you want to run simulations on NEST or SpiNNaker, you will need Python in version 2.7 and pip must be installed, as well as the PyPi package pyNN. You can install the latter using
(sudo) pip install pyNNIn order to run network simulations you also need to install NEST or PyNN with an appropriate simulator backend (for example sPyNNaker). See NEST Docu or SpiNNaker Docu for information on how to install these simulator backends. More detailed information is stated at our doxygen page here.
Once the above requirements are fulfilled, simply run
git clone https://github.com/hbp-unibi/cypress
mkdir cypress/build && cd cypress/build
cmake ..
make && make testThe recommended way to use cypress is to use CMakes ExternalProject_Add. An example project how to use that can be found at github. This repository should be the starting point for your networks. See below for more details.
However, if you want to use cypress more directly, here is an example how to do that:
#include <cypress/cypress.hpp>

using namespace cypress;

int main(int argc, const char *argv[])
{
    // Print some usage information
    if (argc != 2) {
        std::cout << "Usage: " << argv[0] << " <SIMULATOR>" << std::endl;
        return 1;
    }

    // Create the network description and run it
    Network net = Network()
        .add_population<SpikeSourceArray>("source", 1, {100.0, 200.0, 300.0})
        .add_population<IfCondExp>("neuron", 4, {}, {"spikes"})
        .add_connection("source", "neuron", Connector::all_to_all(0.16))
        .run(argv[1]);

    // Print the results
    for (auto neuron: net.population<IfCondExp>("neuron")) {
        std::cout << "Spike times for neuron " << neuron.nid() << std::endl;
        std::cout << neuron.signals().get_spikes();
    }
    return 0;
}
You can compile this code using the following command line:
g++ -std=c++14 cypress_test.cpp -o cypress_test -lcypress -lpthread -ldlThen run it with the native NEST backing using
./cypress_test nestOther backends include pynn.X where X is the name of a PyNN backend, or
nmpi.X or nmpi.pynn.X where X is the name of a PyNN backend that should
be executed on the NMPI platform. See below for details.
The API of Cypress is extremely consistent: network description objects exhibit a common set of methods for setting parameters and performing connections. The following constructs are all valid:
Population<IfCondExp> pop(net, 10, IfCondExpParameters().v_rest(-65.0).v_thresh(-40.0));
PopulationView<IfCondExp> view = pop(3, 5);
Neuron<IfCondExp> n1 = view[0]; // Neuron three
Neuron<IfCondExp> n2 = pop[1];

view.connect_to(pop[6], Connector::all_to_all(0.1, 0.1)); // weight, delay
n2.connect_to(view, Connector::all_to_all(0.1, 0.1));Cypress utilises PyNN to provide a multitude of simulation platforms, including the digital manycore system SpiNNaker (early codename NM-MC1) developed at the University of Manchester and the analogue physical model system BrainScaleS (early codename NM-PM1) developed at the Kirchhoff Institute for Physics at Heidelberg University.
Especially when procedurally constructing large neural networks, Python might be a major bottleneck. However, constructing networks in C++ is extremely fast. Furthermore, this amazing alien C++ technology-thingy allows to detect most errors in your code before actually executing it. Who would have thought of that?
Simply call create_dot(netw, "graph_label") to create a simplified visualization of your created network.
Currently we support the following backends:
gennmakes use of the Gpu-Enhanced Neuronal Network Simulation environment GeNNpynn.nestis using the NEST simulator via PyNN (see nest for installation instructions)nestexperimental implementation of NEST SLI with reduced set of supported featuresspinnakeruses the digital SpiNNaker architecture via its pyNN interface (see SpiNNaker)nmpm1is using the BrainScaleS system BrainScaleS and its executable system specificationESSspikey, the predecessor of BrainScaleS Spikey
Futhermore, backends available through the Neuromorphic Platform Service nmpi can be used via nmpi.backend. If you have access to the Heidelberg server environment, jobs can be executed from the entry server or one of the computation nodes by using slurm.x, with which resources are automatically allocated.
To parallelize simulators, json.x serializes a network to json and executes an independent process with simulator x, reading the network infrastructure from the generate json.
There are several optimization knobs you can use to tune the simulation. These can be used by amending the backend string, e.g. spinnaker='{"option" : value, "option2" : value2, ...}'. This is used for backend specific options expected from pynn.setup(...), but also for some additional options which are listed here.
The easiest way is to set up your project like in this example project github.
For installation of cypress, choose the installation path calling cmake .. -DCMAKE_INSTALL_PREFIX=<path> -DSTATIC_LINKING=TRUE from your build folder (replacing <path> with your installation path). Here, we recommend to install using ~/.local/ for installation without sudo.
Currently, you also need to change the CMakeLists.txt in external/pybind11/. In lines 151/155 disable the if statement (pybind11 issue 1733). A final make && make install will install the project to your requested location.
In your subproject, add
find_package(Cypress REQUIRED)
include_directories(${CYPRESS_INCLUDE_DIRS})
to your cmake file. All your executables must then be linked to ${CYPRESS_LIBRARY}.
Q: Executing make && make test (or during simulations) the program aborts with a seg fault.
A: Try building without static linking (comment line 52 in CMakeLists.txt) SET(CMAKE_EXE_LINKER_FLAGS "${CMAKE_EXE_LINKER_FLAGS} -static")
Q: On SpiNNaker, there is an issue: C++ exception with description "KeyError: "Unexpected key type: <type 'unicode'>"
A: Manually patch lib/python2.7/site-packages/SpiNNUtilities-1!4.0.1-py2.7.egg/spinn_utilities/ranged/abstract_dict.py : replace str by basestring in line 222
Q: Building together with QT, you encounter a problem with cypress signals
A: Please include cypress before QT. QT defines a macro Signals, which is then trying to replace stuff in cypress headers...
This project has been initiated by Andreas Stöckel in 2016 while working at Bielefeld University in the Cognitronics and Sensor Systems Group which is part of the Human Brain Project, SP 9 and has been continued by Christoph Ostrau, formerly Jenzen.
This project and all its files are licensed under the GPL version 3 unless explicitly stated differently.