Table of Contents
- TowerDefense
- Compilation information
- Usage information
- Project configuration (in case something isn't working)
- Documentation
This project uses [SFML] (http://www.sfml-dev.org/) as its GUI library. SFML 2.1 files are included in the project in its own directory and the project properties are already configured to this directory. Thus, SFML should compile with the project without additional configuration. If there is an issue, please go through the steps in the Project configuration section: [Installing SFML].
This project uses Cppunit as a testing library. Cppunit files are included in the project in its own directory and the project properties are already configured to this directory. Thus, Cppunit should compile with the project without additional configuration.
The header files for the project are included in the project's additional includes path. If this is not configured properly, please check the following: - Right click project name in Solution Explorer, click on Properties - Go to Configuration Properties > C/C++ > General - Check to see "../TowerDefense/include" is in the field for Additional Include Directories
While playing the game, here are some useful key bindings: - Right click to delete a map cell or a section of a path - Press U while selecting a Tower to upgrade it - Right click a Tower to sell it - Press W to toggle on and off waypoints along the path
SFML is the graphical library we will be using for this project. It's a dependency for the project, so please install it locally by following the steps below.
- First, you must download the SFML SDK from the download page.
- You must download the package that matches your version of Visual C++. If you got your VS2012 from the Dreamspark school download, its a 32-bit version (even if your system is 64-bit). So, if your VS2012 is 32-bit, download the "Visual C++ 11 (2012) - 32 bits" SFML package.
- Remember where you extract your SFML folder to because you will need that path to link it up to VS.
- When you open the jamms project in Visual Studio, you have to tell the complier where your SFML headers are and the linker where to find the SFML libraries. When you first pull the project off our repo, you have to change the linkage to your local url where SFML was extracted to.
- In the project's properties, add:
- The path to the SFML headers (/include) to C/C++ » General » Additional Include Directories
- The path to the SFML libraries (/lib) to Linker » General » Additional Library Directories
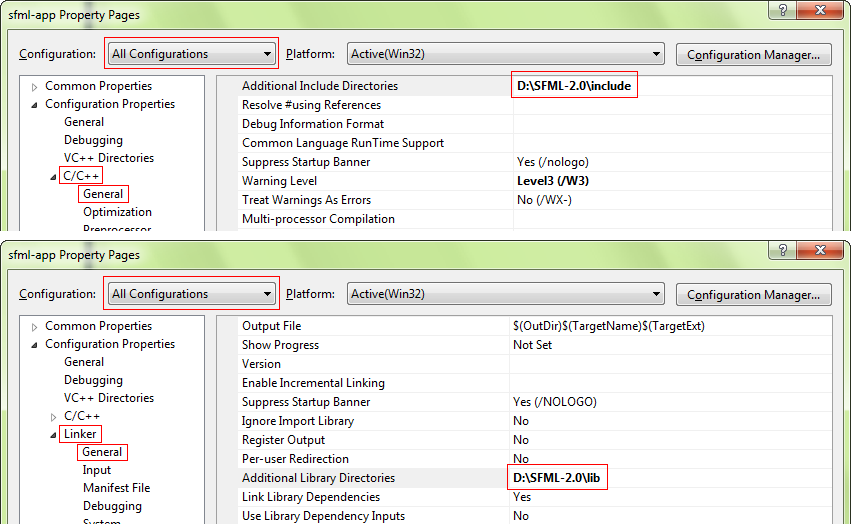
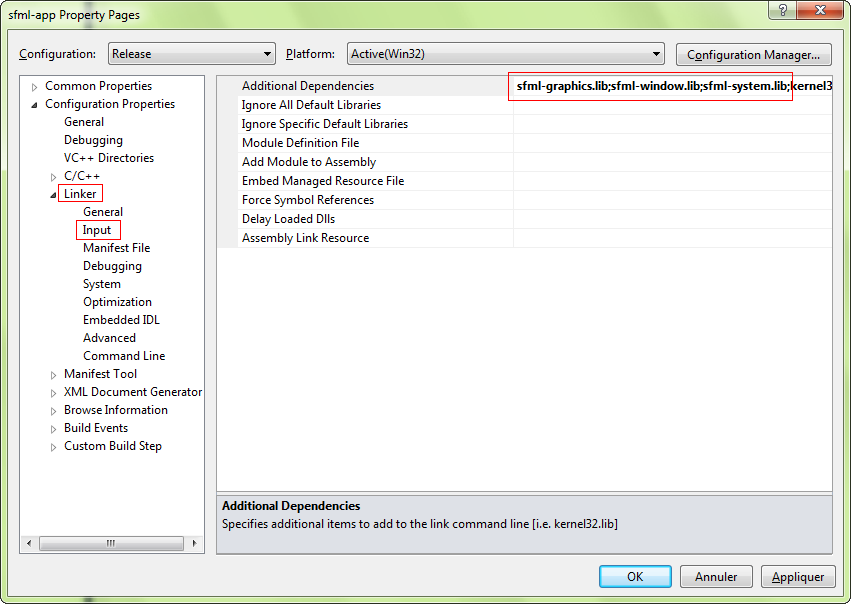
- Then link your application to the SFML libraries (.lib files) that you will need. SFML is made of 5 modules (system, window, graphics, network and audio), and there's one library for each of them. We're going to add the Debug version because we're running the solution using the debugger in VS. Libraries must be added in the project's properties, in Linker » Input » Additional Dependencies. This should be done already, but check that all the SFML libraries that you need are there in your solution (the ones in the pic are just examples):
- sfml-system-d.lib;sfml-main-d.lib;sfml-graphics-d.lib;sfml-audio-d.lib;sfml-network-d.lib;sfml-window-d.lib;
- Last step, you need to copy all your SFML .dll files into the Debug folder of your jamms project.
- Copy all .dll files FROM SFML-2.1/bin into jamms/Debug
- Make sure you're only adding .dll files
- Now, your SFML should be ready! I've included a SFMLTest.txt file with code that should render a green circle in AN EMPTY SOLUTION if SFML is properly installed. To test, you can copy the code in SFMLTest.txt into your main cpp file and run the main function. If a green circle appears, then SFML works! :) Alternatively, you can just run the exisiting jamms project to test.
All UML diagrams presented at the final demo are included in the Documentation folder under Final Presentation UML Diagrams.
This project has generated Doxygen documentation, including comments, class hierarchies, and diagrams. To view the documentation: - The documentation is located in the Documentation folder - Open any of the HTML files in a browser (you can click and drag an HTML file into a new browser window). - All of the documentation pages and tabs will be available in a webpage format.